
You don't need Jenkins
Automate like you mean it, the most naive CI/CD tutorial

The main motivation for writing this article was the lack of a good tutorial on creating pipelines on Linux exclusively without overcomplicated garbage. I made the architecture of this solution as complete as possible and yet easy to use for any DevOps engineer. I skip here CircleCI, TeamCity, JFrog, Jenkins, and many other solutions that manage continuous integration and auto-deployment because they introduce complexity, vendor locking and additional attack vectors on your SDLC.
Often, when you work with security startups, you need a lean supply chain with minimal dependencies. So having a good tutorial to create straightforward automation is quite handy.

The concept we are going to implement is simple: when a developer pushes the code to the main branch, Gitea sends a request to a server, which runs a deploy script that pulls and installs the new version.
The tutorial has the following features:
Automatic deployment of a chosen branch on an update
Maintenance of logs for every succeeded or failed deployment
Automatic issue creation when the deployment fails
Uses only simple everyday Linux tools
Prerequisites
For this tutorial, you need only: a repository on Gitea and an Ubuntu server to host your website.
💡 Even though this tutorial was tested on Ubuntu 24.10 it should work well on other systems with minimal adjustments. If you don’t use Gitea, any other service that supports web hooks, like Github or Gitlab, will work.
Step 1. Getting started
First, install dependencies and tools on your server. I use Nginx, NPM, and Pm2, but you can use other tools that suit your preferences. If you do, align the suggestions from this tutorial accordingly. The following few lines show how to install dependencies for the above stack.
apt update -y && apt upgrade -y
apt install -y nginx certbot python3-certbot-nginx curl
systemctl start nginx
# install certificates for your website on the server
certbot --nginx -d example.com
# if you use npm, it is better to ensure the specific version
curl https://raw.githubusercontent.com/creationix/nvm/master/install.sh | bash
nvm install 20.18
nvm use 20.18
nvm alias default 20.18
The server also needs a deployment key to access your repository. To create the deployment key you can use ssh-keygen.
ssh-keygen -t ed25519
# follow the steps to create a keypair /root/.ssh/id_ed25519
# this will become your deployment key
cat /root/.ssh/id_ed25519.pub
To add the deployment key to your repository, go to the repository settings tab on Gitea. The web interface should look similar on other platforms, too.
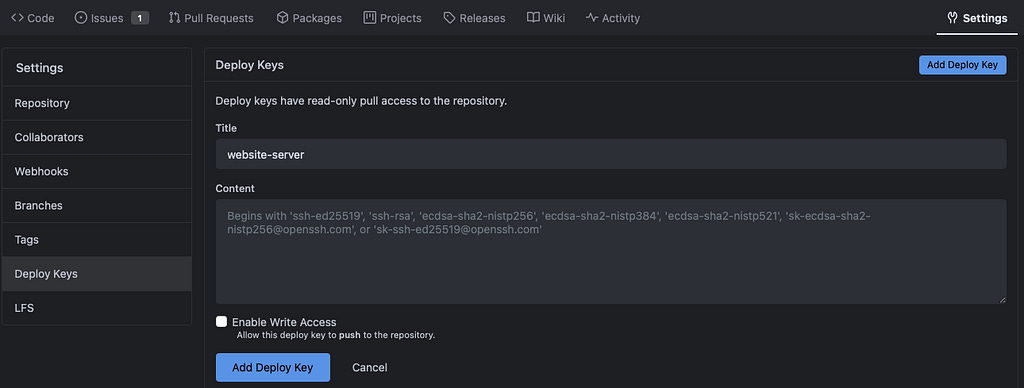
⚠️ Do not give the write access to the key. This protects the code from attacker who breached into the server.
Now, you should be able to clone the repository to your server. It is important to pick the SSH link rather than HTTPs since we added the SSH deployment key before.
git clone git@github.com:example/example.git /root💡 Most websites use the .env file to build so don’t forget to add it.
Now you have everything needed to deploy your website.
Step 2. Deploying the website
Step 2.a. Deploying a static (SSG) website
This script is handy even when you don’t have the auto-deploy because you can just run it to deploy your code. Save it as /root/scripts/deploy.sh.
#!/bin/bash
set -e

logs=$1

cd /root/example
source /root/.nvm/nvm.sh
mkdir -p "$logs"

latest_log="${logs}/latest.log"
echo "Deploying the latest version" > $latest_log
git fetch origin main >> $latest_log 2>&1
git reset --hard origin/main >> $latest_log 2>&1

# Build static content (align to your project)
npm i >> $latest_log 2>&1
npm run generate >> $latest_log 2>&1

# Install
mkdir -p /var/www/example_html
cp -rf /root/example/dist/* /var/www/example_html/

# Log
comm_hash=$(git rev-parse --short HEAD)
echo "Deployed ${comm_hash}" >> $latest_log 2>&1
mv "${logs}/latest.log" "${logs}/$comm_hash.log"
⚠️ Make sure you replace all example in the script with your real website.
The script takes one argument, logs, which is the path to the folder where to keep logs. You can call it like /root/scripts/deploy.sh /var/log/autodeploy.
💡 On success the script will create a file /var/log/autodeploy/143c715.log, where the name is the hash of the commit, containing the full log of the deployment. On failure the log will be in /var/log/autodeploy/latest.log.
Next, configure Nginx to serve your website.
sudo tee /etc/nginx/nginx.conf << EOF
user www-data;
worker_processes auto;
pid /run/nginx.pid;
error_log /var/log/nginx/error.log;
include /etc/nginx/modules-enabled/*.conf;

events {
        worker_connections 120;
}

http {
        sendfile on;
        tcp_nopush on;
        types_hash_max_size 2048;
        include /etc/nginx/mime.types;
        default_type application/octet-stream;
        ssl_protocols TLSv1 TLSv1.1 TLSv1.2 TLSv1.3; # Dropping SSLv3, ref: POODLE
        ssl_prefer_server_ciphers on;
        access_log /var/log/nginx/access.log;
        gzip on;

        server {
                client_max_body_size 100M;
                access_log /var/log/nginx/data-access.log combined;
                server_name localhost example.com;

                root /var/www/example_html;
                index index.html;

                error_page 404 /404.html;
                location = /404.html {
                        internal;
                }

                location = / {
                        try_files /index.html =404;
                }

                location / {
                        try_files $uri $uri/ /404.html;
                }

                listen [::]:443 ssl ipv6only=on; # managed by Certbot
                listen 443 ssl; # managed by Certbot
                ssl_certificate /etc/letsencrypt/live/example.com/fullchain.pem; # managed by Certbot
                ssl_certificate_key /etc/letsencrypt/live/example.com/privkey.pem; # managed by Certbot
                include /etc/letsencrypt/options-ssl-nginx.conf; # managed by Certbot
                ssl_dhparam /etc/letsencrypt/ssl-dhparams.pem; # managed by Certbot
        }

        server {
                if ($host = example.com) {
                        return 301 https://$host$request_uri;
                } # managed by Certbot

                listen 80;
                listen [::]:80;
                server_name localhost example.com;
                return 404; # managed by Certbot
        }
}
EOF
sudo systemctl restart nginx
Don’t forget to restart the Nginx daemon, sudo systemctl restart nginx, after changing the /etc/nginx/nginx.conf.
Step 2.b. Deploying a dynamic (SSR) Website
Deploying a dynamic website is different from a static one in a way that the content will be served by NPM instead of Nginx. I assume you are using Pm2 and have created ecosystem.config.js it in your project for this tutorial. The code snippet below /root/scripts/deploy.sh shows the example ecosystem.config.js. The third code snippet shows how to set up the Nginx to proxy requests to your NPM server.
#!/bin/bash
set -e

logs=$1

cd /root/example
source /root/.nvm/nvm.sh
mkdir -p "$logs"

latest_log="${logs}/latest.log"
echo "Deploying the latest version" > $latest_log
git fetch origin main >> $latest_log 2>&1
git reset --hard origin/main >> $latest_log 2>&1

# Build static content (align to your project)
npm i >> $latest_log 2>&1
npm run build >> $latest_log 2>&1

# Install
npx pm2 restart ecosystem.config.js >> $latest_log 2>&1

# Log
comm_hash=$(git rev-parse --short HEAD)
echo "Deployed ${comm_hash}" >> $latest_log 2>&1
mv "${logs}/latest.log" "${logs}/$comm_hash.log"
const dotenv = require('dotenv');
const autorestart = true;
const { NUXT_APP_NAME } = dotenv.config({ path: './.env' }).parsed;
module.exports = {
apps: [
{
name: NUXT_APP_NAME || 'spa',
exec_mode: 'cluster',
instances: '1', // Or a number of instances
script: 'npm',
args: 'run preview',
watch: true,
autorestart
}
]
}sudo tee /etc/nginx/nginx.conf << EOF
user www-data;
worker_processes auto;
pid /run/nginx.pid;
error_log /var/log/nginx/error.log;
include /etc/nginx/modules-enabled/*.conf;
events {
worker_connections 120;
}
http {
sendfile on;
tcp_nopush on;
types_hash_max_size 2048;
include /etc/nginx/mime.types;
default_type application/octet-stream;
ssl_protocols TLSv1 TLSv1.1 TLSv1.2 TLSv1.3; # Dropping SSLv3, ref: POODLE
ssl_prefer_server_ciphers on;
access_log /var/log/nginx/access.log;
gzip on;
upstream website {
# the preview is usually running on 3000
server 127.0.0.1:3000;
}
server {
client_max_body_size 100M;
access_log /var/log/nginx/data-access.log combined;
server_name localhost example.com;
location / {
proxy_pass http://website;
}
listen [::]:443 ssl ipv6only=on; # managed by Certbot
listen 443 ssl; # managed by Certbot
ssl_certificate /etc/letsencrypt/live/example.com/fullchain.pem; # managed by Certbot
ssl_certificate_key /etc/letsencrypt/live/example.com/privkey.pem; # managed by Certbot
include /etc/letsencrypt/options-ssl-nginx.conf; # managed by Certbot
ssl_dhparam /etc/letsencrypt/ssl-dhparams.pem; # managed by Certbot
}
server {
if ($host = example.com) {
return 301 https://$host$request_uri;
} # managed by Certbot
listen 80;
listen [::]:80;
server_name localhost example.com;
return 404; # managed by Certbot
}
}
EOF
sudo systemctl restart nginxStep 3. Automating the deployment
Here we will create another script that will hook the request from Gitea and run the deployment script we made in step 2. Feel free to call the script /root/scripts/deploy-hook.sh.
#!/bin/bash

logs=/var/log/autodeploy

while true; do
    echo -e "HTTP/1.1 200 OK\r\nContent-Type: text/plain\r\n\r\nDeployment triggered." |
    nc -l -p 3001 -q 1 > /dev/null

    echo "Deploying landing"
    output=$({ /usr/bin/time -f "%e" /root/scripts/deploy.sh $logs; } 2>&1)
    exitcode=$?

    # Needs tail because in case of error the output also has error log
    seconds=$(echo "$output" | tail -n1)
    if [ $exitcode -ne 0 ]; then
        echo "Failed after ${seconds}s"
    else
        echo "Deployed after ${seconds}s"
    fi
done
Next, create and start the system service to run your deploy hook continuously.
sudo tee /etc/systemd/system/autodeploy.service << EOF
[Unit]
Description="Landing autodeploy"
Wants=network-online.target
After=network-online.target

[Service]
User=root
Group=root
Type=simple
ExecStart=/root/scripts/deploy-hook.sh

[Install]
WantedBy=multi-user.target
EOF
sudo systemctl daemon-reload
sudo systemctl enable autodeploy
sudo systemctl start autodeploy
Finally, you will need to adjust the Nginx.
...

http {
        ...

        # <=============== ADD THIS
        upstream autodeploy {
                server 127.0.0.1:3001;
        }
        # ===============>

        server {
                ...

                # <=============== ADD THIS
                location /redeploy {
                        # Require a specific token in the Authorization header
                        if ($http_authorization != "Bearer NghvlryWbpgXsVNihlSqaMJzdqX") {
                                return 401;
                        }
                        proxy_pass http://autodeploy;
                }
                # ===============>

                listen [::]:443 ssl ipv6only=on; # managed by Certbot
                listen 443 ssl; # managed by Certbot
                ...
        }
}
⚠️ Never use secret tokens from tutorials and create your own.
Brilliant! Now, you should be able to run the deployment from outside of your server. Just go to the terminal on your laptop and execute the following request.
curl -H "Authorization: Bearer NghvlryWbpgXsVNihlSqaMJzdqX" https://example.com/redeployNow, go to your Gitea repository and add a webhook that will trigger a push to the main branch (or any other branch that you prefer), and will use the https://example.com/redeploy link with the authorization header as Bearer NghvlryWbpgXsVNihlSqaMJzdqX.
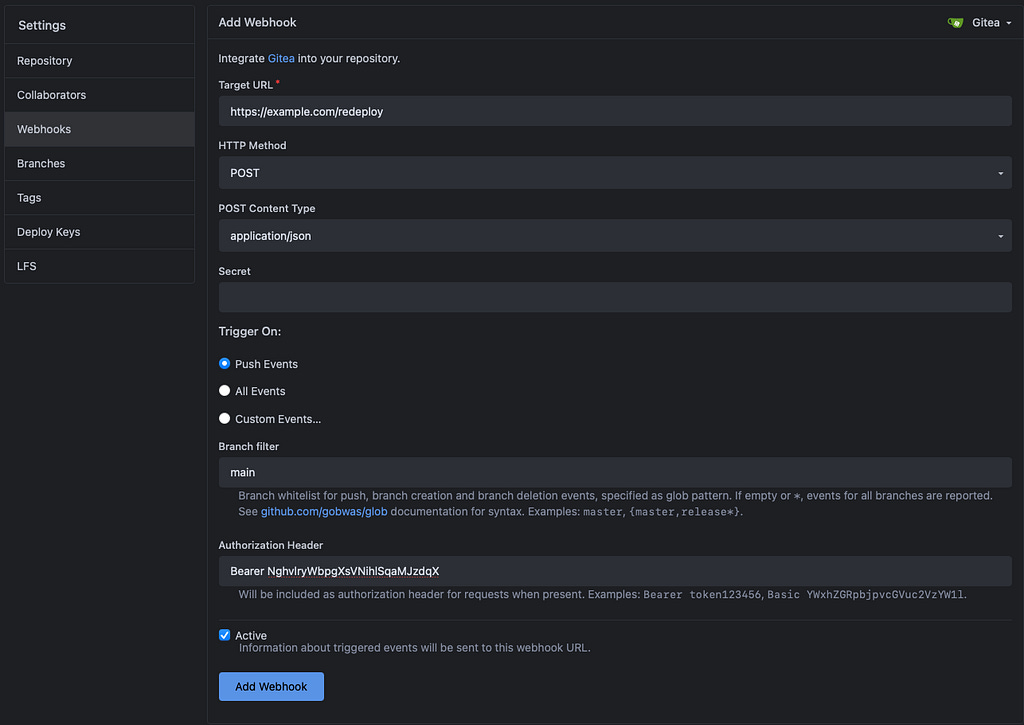
Try to make a sample (for example changing the README.md) push to your repository and see how the website gets redeployed in logs.
journalctl -u autodeploy
ls /var/log/autodeploy
Step 4. Take it one step further!
If you want to make it shine and automatically create git issues, you can add another script /root/scripts/create-issue.sh. The script is created for the Gitea API, so if you are using a different provider, like GitHub, you will need to look at the GitHub API
#!/bin/bash

# Script to report a failed deployment as a gitea issue
# "seconds" is how much time the failed deployment took
logs=$1
seconds=$2
gitea_token="877b...1435"

# If deploy fails, latest.log is retained for debugging
json_str_content=$(jq -Rs --arg prefix '```' --arg suffix '```' \
        '($prefix + . + $suffix)' "${logs}/latest.log")
# Has special format that due date needs (-_-)
tomorrow_datetime=$(date -d "+1 day" -u +"%Y-%m-%dT%H:%M:%S.%3NZ")

cd /root/landing-website/
#last_committer=$(git log -1 --pretty=format:"%ce")
comm_hash=$(git rev-parse --short HEAD)

echo "Creating deployment issue on gitea"

curl -sS --fail -o /dev/null -X POST \
  -H "X-GITEA-OTP: ${gitea_token}" \
  -H "Content-Type: application/json" \
  -d "{
    \"title\": \"Deploy failed for ${comm_hash} after ${seconds}s\",
    \"body\": ${json_str_content},
    \"due_date\": \"${tomorrow_datetime}\",
    \"assignees\": [],
    \"closed\": false,
    \"labels\": [0],
    \"milestone\": 0
  }" \
  "https://gitea.detee.cloud/api/v1/repos/example/example/issues?token=${gitea_token}"
Then, add it into the deployment hook, like this.
#!/bin/bash

logs=/var/log/autodeploy

while true; do
    echo -e "HTTP/1.1 200 OK\r\nContent-Type: text/plain\r\n\r\nDeployment triggered." |
    nc -l -p 3001 -q 1 > /dev/null

    echo "Deploying landing"
    output=$({ /usr/bin/time -f "%e" /root/scripts/deploy.sh $logs; } 2>&1)
    exitcode=$?

    # Needs tail because in case of error the output also has error log
    seconds=$(echo "$output" | tail -n1)
    if [ $exitcode -ne 0 ]; then
        echo "Failed after ${seconds}s"
        # <=============== ADD THIS
        /root/scripts/create-issue.sh $logs $seconds
        # ===============>
    else
        echo "Deployed after ${seconds}s"
    fi
done
How to obtain a Gitea token
First, create an auto-deploy user. You can also use your user for this purpose but it is less secure, so I recommend making a dedicated user with limited access. To generate a token, go to the user settings, and then the Applications tab. Select the following permissions to generate the token.
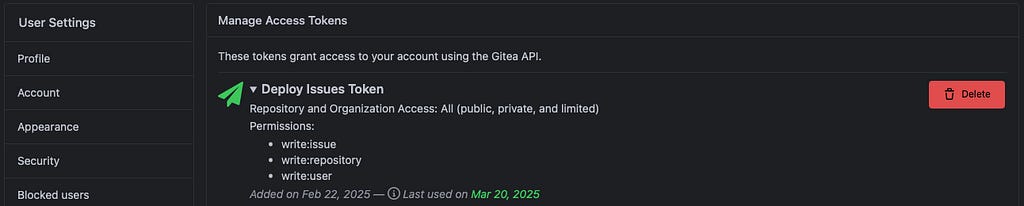
You can now insert your token into the /root/scripts/create-issue.sh script and test it by creating a sample /var/log/autodeploy/latest.log file and then run the create-issue.sh.
/root/scripts/create-issue.sh /var/log/autodeploy 10This should create an issue in the example/example repository that contains the full log.
Conclusion
If you’ve read this far, congratulations. You have just finished the comprehensive end-to-end tutorial for creating a continuous integration using only Linux tools.